Now it's time to have some fun with graphics. It's also time to depart from the long tradition of computer programming classes which have considered graphics as an "advanced" topic. Let's face it, pictures are fun. And since one picture is worth a thousand words, let's use them to help us understand computer programming right from the very beginning.
We'll start by writing a simple 2 line program and then experiment with it to explore how it works. Then we'll go through an example to help you do the exercises at the end of the lesson. Let's get started...
Start by opening a QBASIC window:

Press the "Escape" key (Esc) to clear the "Welcome" dialog box:

Then type in the following QBASIC statements:
as shown here:

Next select the "Run" and "Start" menu options as shown here:

This should give you the following result:

Congratulations!! You've just written a computer graphics program in QBASIC!
Enjoy the results of your work for a few seconds and then press almost any key to continue (as it says at the bottom of the screen). I suggest pressing the space bar as a consistent habit. This will be the normal procedure whenever you run a program. You use the Run/Start command to run it, and then press the space bar when you're done.
Now let's try to understand what we've done. Let's start with that first statement:
I won't go into too much detail (for now), but the "SCREEN" statement tells the computer what kind of graphics (or text) screen that we want to use for our program. The number "12" is a code number for a screen that's 640 dots wide and 480 dots tall (more on this in later lessons).
Now let's look at the second statement:
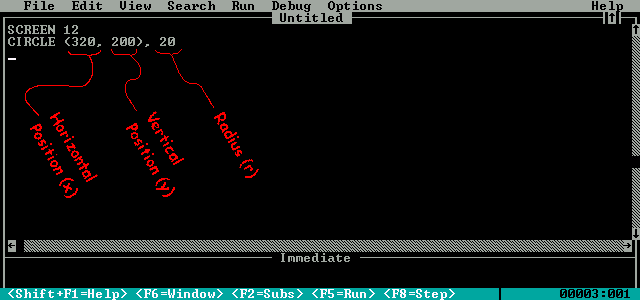
As you might expect, this statement tells the computer to draw a circle. The numbers tell the computer where to put it and how big to make it. I could tell you what these numbers do, but let's experiment with them instead. Let's change the first number from 100 to 200:
Now run it again to see what happens...

Hmmmm... We have the same circle, but it seems to have moved to the right. Let's try to go even farther by changing the 200 to 500:
Now run it again and you should get the following result:

Sure enough, it appears that the first number moves the circle across the screen. The larger the number the farther right it goes. What if we try making it smaller? Let's try setting it to zero:
Go ahead and run it to get the following result:

Very interesting! Now the circle is so far left that half of it is cut off. Now we might be ready to make a guess at what that first number does. Do you have any ideas? How about guessing that the first number tells the computer where to put the center of the circle in the horizontal direction? It seems that 0 puts the center exactly on the left edge, and 500 puts the circle pretty near the right edge. Do you remember that the "SCREEN 12" statement tells the computer to make a screen that's 640 dots wide? If that's true, then we should be able to move the center of our circle to the right edge by selecting 640 for that first number. Let's try it:
Now let's put our theory to the test. Run the program to get:

Great! So 0 puts the center at the left edge, and 640 put the center on the right edge. Let's try one last test to confirm our theory. If 0 is far left, and 640 is far right then half of 640 should put it exactly in the middle. So let's divide 640 by 2 to get 320:
Now let's put this new theory to the test. Run the program to get:

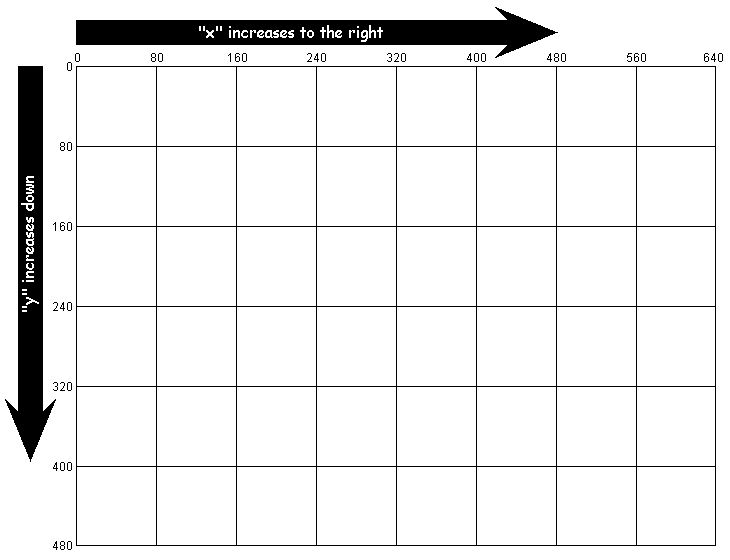
It looks like the theory worked! The 320 put the circle right in the middle of the screen - in the horizontal direction. In computer graphics (and mathematics in general) we call this the "x" direction. The following picture shows all of our circles along with a "ruler" showing their horizontal ("x") positions:

Now we can go back to our program and make a mental note of what that first number does in the CIRCLE statement:

Any guesses about what the second number does? Let's change it to find out. Try changing the second number (currently 100) to 200:
Then run it to see what happens:

As you might have guessed, the second number controls the vertical position of the circle. We call this the "y" position, but note that larger "y" values move the circle down (not up). This is the reverse of the normal mathematical convention, but you can remember both the "x" and "y" conventions by remembering that they progress in the same direction as normal English writing. We write on a page from left to right ("x" direction) and from the top down ("y" direction). Both of these are summarized in the following diagram:

You can use this diagram as a template to help you design your own graphics later on in today's lesson.
Now that we know what the second number does, let's add another note to our ourselves:

OK, now we're almost done with our little program. There's only one more number left in the current circle statement. Take a moment and think about what that last 100 might be telling the computer to do...
Did you guess? It's the radius or size of the circle. Let's change it to a smaller value (like 20) to verify our guess:
Try running this new program to see what you get:

Did it get smaller as you expected? Of course it did, because a computer is a machine that follows instructions. As long as you give it the right instructions, it will do what you want it to do!
Now we're ready to finish our notes on the CIRCLE statement:

As you can see from the notes, the CIRCLE statement needs the center point of the circle (x and y) along with a radius (r) so it will know where to draw the circle and how big to make it:
That's all there is to it!
OK, now it's time for a few exercises. Each exercise will start with a picture that we want to make. Your job will be to write and test a QBASIC program to draw each picture. Here's an example:

Solution:
We want to draw two circles to make a figure "8". The top circle of the "8" has its center at x=320 and y=160. The radius of the top circle is 80 (you can subtract 400-320). The lower circle has the same x position and the same radius, but the y position of its center is at y=320. With all of this information, we can write the following program:
If you run that program, you should get the result shown here:

Use this same approach to write a QBASIC program to draw each of pictures in the following exercises.


